Mastering Water Heater Maintenance for Longevity: Essential Tips and Expert Advice
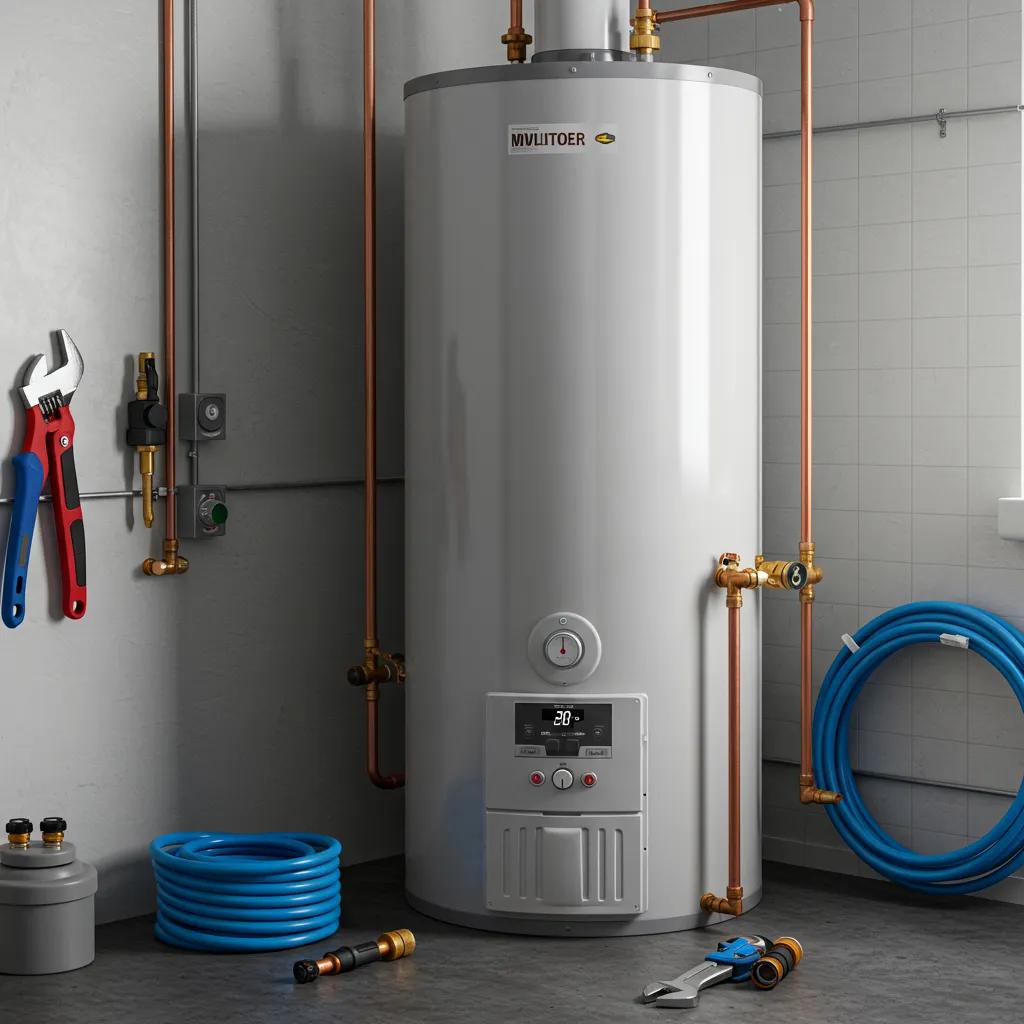
Regular water heater maintenance is the set of routine inspections and preventative services that keep your hot water system efficient, safe, and long-lived. Performing targeted tasks such as flushing sediment, testing the temperature and pressure relief (TPR) valve, and inspecting the anode rod reduces energy use, prevents premature failures, and helps homeowners avoid costly emergency repairs. This guide explains what maintenance tasks matter most, how and when to perform them, and how Los Angeles hard water influences scheduling and techniques. You will learn clear flushing procedures, signs that an anode rod needs replacement, safe TPR testing steps, thermostat settings that balance safety and efficiency, and specialized tankless descaling methods. The article also includes practical checklists, EAV-style tables summarizing task frequency and tools, and actionable lists optimized for homeowners and property managers. If a task becomes complex or risky, this guide points to trusted professional options and what to expect when booking a skilled service.
How Often Should You Perform Preventative Water Heater Maintenance?
Preventative water heater maintenance means scheduled inspections and tasks designed to preserve performance and prevent failures by addressing the main failure drivers: sediment, corrosion, and pressure. Regular maintenance improves heat transfer, reduces energy consumption, and uncovers small issues before they escalate into leaks or system failures. An annual baseline inspection is the most common recommendation, adjusted upward for hard-water conditions, high usage, or older equipment. Routine maintenance typically includes flushing sediment, inspecting the anode rod, testing the TPR valve, checking thermostat settings, and verifying the drain pan and leak detectors, which together reduce risk and extend expected service life.
Maintenance frequency recommendations depend on unit type, water quality, and usage patterns, so homeowners should adopt a cadence that reflects local conditions and appliance characteristics. The next subsection outlines a practical flushing schedule aligned to common scenarios and signs that indicate a need for immediate attention.
What Is the Recommended Water Heater Flushing Schedule?
Standard guidance for tank water heater flushing is to perform a full drain-and-flush once per year under normal water conditions, which preserves efficiency and removes sediment that impedes heat transfer. In areas with moderate to hard water, semiannual flushing is prudent because mineral accumulation accelerates, leading to popping or rumbling noises, slower recovery, and discolored hot water. For tankless water heaters, follow the manufacturer’s recommended descaling frequency—commonly once per year in average conditions and as often as every six months in very hard water—to protect the heat exchanger and maintain flow rates. Monitor operational indicators such as decreased hot water volume, unusual noises, or persistent cloudiness; these symptoms suggest you should flush sooner than scheduled.
After establishing a schedule, adjust it based on local water hardness and household demand; the following subsection explains how Los Angeles water quality typically affects cadence and mitigation choices.
How Does Hard Water Affect Maintenance Frequency in Los Angeles?
Hard water increases mineral precipitation inside tanks and on heating elements, which accelerates sediment buildup and scale formation; as a result, water heaters in areas with higher mineral content require more frequent attention. In the Los Angeles region, many properties encounter hard water that elevates the rate of sediment accumulation and scale on heat exchangers, so homeowners should consider semiannual flushing for tank systems and more frequent descaling for tankless units. Using a water softener or point-of-entry conditioning can materially reduce maintenance needs by lowering mineral load, but these solutions themselves require proper sizing and periodic maintenance. Commercial installations and high-demand residential properties—like multi-bath homes—will also need a tighter maintenance cadence compared with single-family, low-demand units.
To translate this into action, measure local water hardness or consult a professional water test, then increase flushing and inspection frequency proportionally; the next section provides the step-by-step flushing procedure for tank systems so you can act on your new schedule.
What Are the Step-by-Step Procedures for Water Heater Flushing and Sediment Removal?
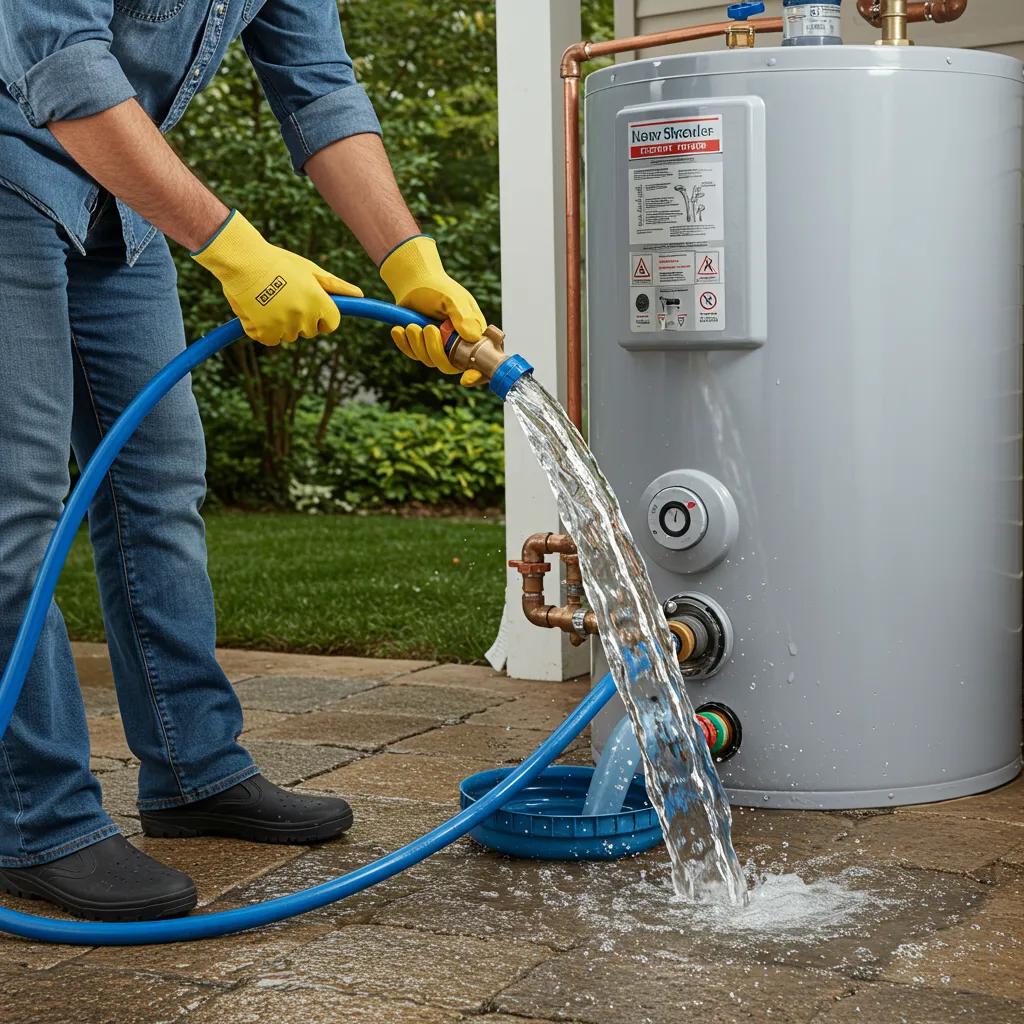
Flushing a tank-type water heater is a controlled process that removes settled sediment from the tank, restoring heat transfer efficiency and reducing the risk of overheating and corrosion. The primary mechanism is to isolate the heater, cool it if necessary, open the drain, and flush until discharged water runs clear; this simple sequence prevents sediment from abrading elements or insulating heat transfer surfaces. Flushing typically takes 30–60 minutes for a full drain and refill, though heavy sediment or older tanks can require more time or professional vacuuming. Performing this task safely requires the right tools and attention to gas/electric isolation, and following the steps below minimizes scald and pressure risks.
Before the numbered procedure, gather recommended tools and check basic safety items so the work proceeds without delays or hazards.
- Shut off power or gas: Turn off the electric breaker or set the gas valve to pilot; ensure the burner or element is inactive to prevent dry-fire damage.
- Turn off cold-water supply: Close the inlet valve to isolate the tank, then open a hot water faucet to relieve pressure.
- Attach hose and drain: Connect a garden hose to the tank drain valve and route to a safe drain location; open the valve and allow the tank to empty.
- Flush with cold water: With the drain open, briefly open the cold-water inlet to agitate and flush out sediment until the discharge runs clear; repeat as needed and then close drain, refill slowly, and restore power or gas.
After flushing, check for leaks at the drain valve and fittings; if the drain valve shows persistent leakage or the tank fails to clear of sediment, it is time to consult a professional plumber for deeper cleaning or component replacement. The next paragraph explains common reasons to call a technician and how professionals can help.
For homeowners who prefer to avoid the risk or complexity of a full flush—especially in cases of heavy sediment, corroded valves, or older tanks—professional flushing services provide mechanical agitation, vacuuming, and safe disposal, and a qualified plumber can also inspect the anode rod and TPR valve while onsite. Anytime Rooter, a family-owned plumbing company based in Marina Del Rey serving the Los Angeles community, offers flushing and sediment removal as part of their water heater services; they provide free estimates, transparent pricing, licensed and insured technicians, and 24/7 emergency plumbing for urgent concerns. If you encounter stubborn sediment, leaking drain valves, or are unsure about gas or electrical isolation, booking a professional inspection is a sensible step to protect the appliance and the property.
Why Is Flushing Critical for Water Heater Efficiency and Longevity?
Flushing removes sediment that acts as thermal insulation at the tank bottom, forcing the burner or heating elements to work harder and increasing fuel or electricity consumption. Sediment particles can cause localized overheating, which accelerates tank corrosion and undermines the metal integrity that prevents leaks, thereby shortening service life. The efficiency loss from heavy sediment can reach double-digit percentages depending on accumulation, increasing operational costs and raising failure risk. By restoring direct water-to-heat-source contact, flushing recovers lost efficiency, reduces strain on components, and often reduces noises such as popping and rumbling that indicate trapped steam pockets.
Understanding these mechanics helps homeowners prioritize flushing within a preventative maintenance plan; the next subsection provides the precise safety-first steps for executing a safe flush at home.
How Do You Safely Flush Your Water Heater: Tools and Steps Explained?
Safety is paramount when flushing a water heater; the key precautions are to de-energize the unit, verify cool-down time for gas systems, avoid scalding by using protective gear, and ensure the drain path can handle discharge temperatures. Essential tools include a 25-foot garden hose, gloves, eye protection, a sturdy bucket, and an adjustable wrench for valve operations. Follow the numbered steps provided earlier, confirm the drain closes fully afterward, and run multiple cycles of cold-water agitation if the discharge remains cloudy or gritty. If the drain valve is corroded, the anode rod is heavily depleted, or sediment persists despite flushing, stop and call a professional to avoid damaging the tank or creating a hazardous situation.
After completing the flush, check hot water delivery and inspect the TPR valve and anode rod during the refill to catch any additional maintenance needs; the following H2 explains anode rod inspection and replacement in depth.
When and How Should You Inspect and Replace the Anode Rod?

The sacrificial anode rod is a metal rod—often magnesium, aluminum, or zinc alloy—installed inside tank water heaters to corrode preferentially and protect the tank shell from rust. By attracting corrosive elements, the anode rod sacrifices itself and delays tank corrosion, which makes regular inspection and timely replacement vital for prolonging tank life. Inspect the rod visually every 1–3 years depending on water quality, and replace it when it is heavily pitted, less than 1/2-inch in diameter, or coated with hard deposits that prevent electrical contact with tank water. Replacing the anode rod is a relatively simple mechanical task on accessible tanks, but it can be difficult if the unit lacks clear access or the fitting is seized, and material choice influences lifespan and corrosion behavior.
What Are the Signs of a Failing Anode Rod?
Visible depletion, excessive pitting, or a thin rod compared to its original diameter are direct inspection signs that the anode rod has mostly sacrificed itself and needs replacement. Indirect symptoms include a rotten-egg smell (hydrogen sulfide), which can emerge when the rod no longer suppresses bacteria-driven reactions, along with accelerated tank corrosion or rusty water that signals weakening tank protection. Reduced hot water duration or new leak emergence can be late-stage indicators that corrosion has progressed beyond the rod’s protective window. If you notice these signs during routine checks or see accelerated degradation after a recent flush, schedule an inspection and plan for replacement to avoid the more expensive outcome of full tank failure.
How Much Does Anode Rod Replacement Cost and What Influences Pricing?
Anode rod replacement cost varies with material choice, access complexity, and local labor rates, with magnesium rods typically priced differently than aluminum or specialty zinc-enhanced rods; labor increases if the tank requires partial disassembly or the rod fitting is seized. Key cost drivers include whether the job is part of an annual service, whether additional components like the TPR valve or drain valve are replaced at the same time, and whether the plumber must cut insulation or remove panels to access the rod. Transparent estimates are essential because accessibility issues can sharply raise labor time and cost. Scheduling inspections early in a preventative program often reduces replacement difficulty and keeps overall lifecycle costs lower than emergency repairs.
For a no-surprise approach, request a written estimate and scope of work from a licensed provider; Anytime Rooter offers anode rod inspection and replacement services with free estimates and transparent pricing from licensed, insured technicians, which helps homeowners choose appropriate materials and plan maintenance without unexpected charges.
How Do You Test and Maintain the Temperature and Pressure Relief Valve for Safety?
The temperature and pressure relief (TPR) valve is a critical safety device that prevents tank overpressure or overheating by opening to release hot water when preset thresholds are exceeded. Testing the valve annually ensures the mechanism is free-moving and can discharge when needed; failure of the TPR valve can result in dangerous pressure buildup, so a functioning valve is essential to prevent catastrophic tank rupture. Maintenance includes testing the lever to confirm a quick, short discharge and replacing the valve if it sticks, leaks, or shows signs of corrosion, and verifying the discharge piping directs hot water to a safe location. Because testing involves releasing hot water under pressure, adhere to safety protocols and consider professional assistance if the valve is inaccessible or displays poor performance.
Regular TPR valve checks are a simple but vital step that homeowners can integrate into annual maintenance alongside flushing and anode inspection to maintain safe operation and reduce liability risks.
What Are the Steps to Properly Test the TPR Valve?
To test a TPR valve safely, first place a bucket under the discharge line, wear heat-resistant gloves, and confirm the drain path is clear; then lift the test lever briefly to allow a short burst of hot water to escape and ensure it reseats cleanly. The expected result is a quick discharge that stops immediately after releasing the lever; continuous flow or failure to reseat indicates malfunction and the need for valve replacement. Never attempt to test a TPR valve on a pressurized system without relieving tank pressure via an open hot-water tap, and avoid prolonged lifting of the lever to prevent scalding or water loss. If the valve leaks after reseating or cannot be operated by hand, arrange for immediate professional replacement to restore safety functionality.
A working TPR valve protects the tank under extreme conditions, and the following subsection explains why maintaining this valve is essential for preventing severe damage.
Why Is TPR Valve Maintenance Essential for Preventing Water Heater Damage?
A functioning TPR valve prevents dangerous pressure and temperature combinations that can cause tank rupture, explosion, or large-scale water discharge; its role is a fundamental safety control rather than a convenience item. Regular testing and replacement when signs of wear appear reduce the chance of catastrophic failure and property damage, and they are often required by local codes and insurance policies to demonstrate safe appliance stewardship. Ignoring TPR maintenance increases legal and safety risk for homeowners and property managers and can invalidate warranties if catastrophic failure follows neglected upkeep. Treating TPR checks as a non-negotiable element of annual service preserves both safety and asset value.
What Is the Ideal Water Heater Temperature Setting for Efficiency and Safety?
A thermostat setpoint of 120°F (49°C) balances energy savings, scald prevention, and sufficient hot water for most residential uses; this setpoint reduces standby heat loss compared with higher temperatures while limiting scald risk for children and vulnerable adults. Lowering the temperature reduces energy consumption significantly—each 10°F drop can yield notable percentage savings—while very low settings may increase the risk of bacterial growth such as Legionella in poorly maintained systems. For households with small children, elderly occupants, or immunocompromised people, combine a 120°F setpoint with thermostatic mixing valves at fixtures to deliver safe outlet temperatures without forcing the tank to store excessively hot water. Periodic checks of thermostat accuracy and recovery rate help ensure hot water availability for larger loads and maintain efficiency.
Understanding these trade-offs enables homeowners to optimize comfort, safety, and utility costs, and the following subsections quantify energy impacts and mitigation strategies.
How Does Temperature Setting Impact Energy Consumption and Hot Water Supply?
Higher thermostat settings increase standby losses and raise the energy required to maintain tank temperature, with approximate energy impact proportional to the temperature differential between stored water and ambient conditions. For example, increasing the thermostat from 120°F to 140°F noticeably raises standing heat loss and recovery energy, while improving immediate availability of hot water for multiple fixtures without relying on reheating. Insulating the tank and pipes reduces standby losses and allows slightly lower setpoints without sacrificing supply for short-duration high-demand events. When adjusting settings, consider household usage patterns, appliance recovery rates, and insulating strategies to achieve both energy efficiency and adequate hot water.
What Are the Risks of Incorrect Temperature Settings and How to Avoid Them?
Setting the thermostat too high increases scald risk and wasted energy, while setting it too low can create conditions favorable to bacterial growth such as Legionella and reduce the effectiveness of hot-water hygiene. To avoid these risks, maintain a balanced setpoint around 120°F, install thermostatic mixing valves at fixtures used by vulnerable occupants, and periodically raise the temperature briefly (thermal sanitization) during maintenance if bacterial concerns exist. Additionally, ensure proper insulation, regular flushing, and scheduled maintenance so temperature adjustments do not inadvertently create other hazards. Combining temperature management with preventive maintenance preserves safety and energy goals without compromising water quality.
How Do You Maintain Tankless Water Heaters: Descaling and Specialized Care?
Tankless water heaters require specialized maintenance focused on descaling the heat exchanger because mineral scale directly reduces heat transfer and can trigger error codes or limit flow. Descaling is the process of circulating a descaling solution through the unit to dissolve and remove mineral deposits; the procedure restores efficiency and prevents component stress. Frequency depends on water hardness and usage: in typical conditions, annual descaling suffices, while hard-water areas often require descaling every six to twelve months. Proper descaling follows manufacturer protocols to protect warranty coverage and uses approved descalers circulated with a pump kit while isolating the unit from the water supply.
Recognizing scale buildup early and descaling on a schedule preserves flow performance and prevents premature failure of the heat exchanger, and the following subsection explains the chemistry behind scale formation.
What Causes Mineral Scale Buildup in Tankless Water Heaters?
Scale forms when dissolved minerals—primarily calcium and magnesium—precipitate out of water as it heats and concentrate on the interior surfaces of the heat exchanger, creating an insulating layer that reduces thermal transfer efficiency. Tankless systems are particularly sensitive because their compact heat exchangers depend on direct surface contact for efficient heating; even thin scale layers can trigger temperature sensors and error conditions or reduce flow capacity. Water quality testing reveals mineral concentrations and helps determine descaling intervals tailored to local hardness levels. Mitigating scale often involves a combination of descaling schedules and upstream water treatment to reduce incoming mineral load.
What Are the Best Practices for Tankless Water Heater Descaling?
Follow manufacturer-recommended descalers and procedures: isolate the unit, connect a circulation pump and descaling reservoir, circulate the approved descaling solution for the recommended time, flush thoroughly with clean water, and verify unit operation and error-free startup. Use a neutralizing rinse after acidic descalers when required and inspect filters or strainers to prevent debris recirculation. For homeowners in hard-water areas, consider an annual professional descaling service that includes a full diagnostic, because professionals can detect early warning signs and recommend upstream water conditioning where appropriate. Professional service also preserves any manufacturer warranty considerations and delivers a documented maintenance history for property records.
For complex descaling or if the unit displays persistent error codes after DIY descaling, book a professional service; the closing paragraph below explains trusted local options and how to arrange help.
Anytime Rooter, a family-owned and operated plumbing company based in Marina Del Rey that serves the Los Angeles community, provides professional water heater services including flushing, anode rod inspection and replacement, TPR valve testing, and tankless descaling. They offer 24/7 emergency plumbing, transparent pricing, free estimates, and licensed, insured technicians who can assess local hard-water impacts and recommend a tailored maintenance cadence. If maintenance tasks exceed DIY comfort or require specialized equipment, scheduling an inspection with a licensed service provider ensures safe execution and documented recommendations to extend your water heater’s longevity.
Frequently Asked Questions
What are the common signs that indicate a water heater needs maintenance?
Common signs that your water heater requires maintenance include unusual noises such as popping or rumbling, which may indicate sediment buildup. Additionally, if you notice discolored hot water, a decrease in hot water supply, or a rotten-egg smell, these could be signs of a failing anode rod or bacterial growth. Leaks around the unit or a malfunctioning temperature and pressure relief (TPR) valve are also critical indicators that immediate attention is needed to prevent further damage.
How can I improve the efficiency of my water heater?
Improving the efficiency of your water heater can be achieved through regular maintenance practices such as flushing the tank to remove sediment buildup, which can hinder heat transfer. Additionally, setting the thermostat to 120°F balances energy savings and safety. Insulating the tank and pipes can also reduce heat loss, while using a water softener can minimize mineral buildup in hard water areas. Regularly checking and replacing the anode rod will further enhance the longevity and efficiency of your unit.
What should I do if my water heater is leaking?
If your water heater is leaking, the first step is to turn off the power supply and the cold water inlet to prevent further damage. Identify the source of the leak, which could be from the tank, fittings, or the TPR valve. If the leak is from the tank itself, it may indicate a serious issue requiring replacement. For leaks from fittings or valves, tightening or replacing the components may resolve the issue. In any case, contacting a professional plumber is advisable to ensure safe and effective repairs.
How does water quality affect water heater maintenance?
Water quality significantly impacts water heater maintenance, particularly in areas with hard water. Hard water contains high levels of minerals like calcium and magnesium, which can lead to increased sediment buildup and scale formation inside the tank and on heating elements. This necessitates more frequent flushing and descaling to maintain efficiency and prevent overheating. Regular water quality testing can help homeowners adjust their maintenance schedules based on local conditions, ensuring optimal performance and longevity of the water heater.
What are the benefits of hiring a professional for water heater maintenance?
Hiring a professional for water heater maintenance offers several benefits, including expertise in identifying potential issues that may not be apparent to homeowners. Professionals can perform complex tasks safely, such as flushing, inspecting, and replacing components like the anode rod and TPR valve. They also have access to specialized tools and equipment, ensuring thorough and effective maintenance. Additionally, professional services often come with warranties and guarantees, providing peace of mind and protecting your investment in the long run.
How can I tell if my TPR valve is functioning properly?
To determine if your TPR valve is functioning properly, perform an annual test by lifting the test lever to allow a short burst of hot water to escape. The valve should quickly discharge and then reseat without leaking. If water continues to flow after releasing the lever or if the valve is stuck, it may need replacement. Regular testing is crucial, as a malfunctioning TPR valve can lead to dangerous pressure buildup, posing a significant safety risk to your home.
Conclusion
Regular maintenance of your water heater is essential for ensuring efficiency, safety, and longevity, ultimately saving you money on energy bills and repairs. By following the recommended flushing schedules, inspecting the anode rod, and testing the TPR valve, you can prevent costly failures and extend the life of your appliance. For those who prefer professional assistance, Anytime Rooter offers expert services tailored to your needs, ensuring peace of mind. Schedule your maintenance today to keep your water heater running smoothly and efficiently.